Configure Apache load balancer with mod proxy ajp
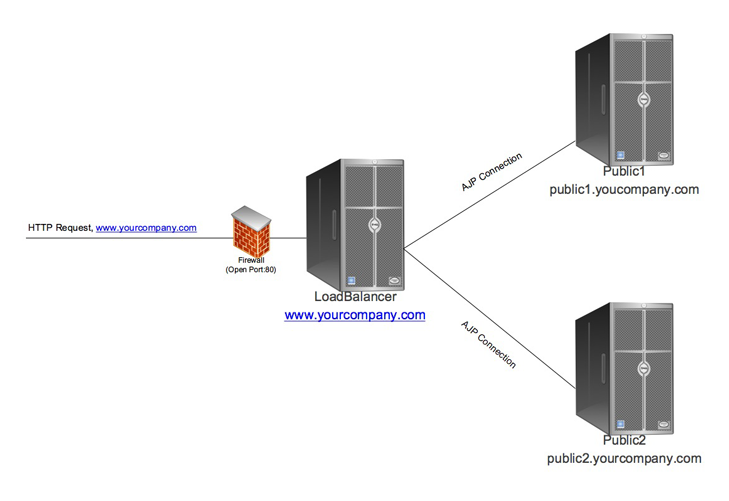
At a certain amount of traffic, or a certain need on availability, you might consider using multiple public instances. Most likely those instances are on different servers as well. This guide will illustrate how to setup a load-balanced system using three different servers, where one acts as the load-balancer (using Apache for splitting the requests) and the two remaining servers host the LogicalDOC public instances.
Sticky session will ensure that one visitor generally will be handled by the same server over the lifetime of a session. This is a requirement for the proper functioning of LogicalDOC in this mode.
Contents
Server setup
The layout may look something like this (we will refer to these names through the rest of the guide).
Enable Apache modules in Ubuntu
Use the following commands:
$ sudo a2enmod proxy
$ sudo a2enmod proxy_ajp
$ sudo a2enmod proxy_balancer
$ sudo a2enmod lbmethod_byrequests
$ sudo a2enmod headers
Run all the above commands then restart Apache to obtain the effect of changes we have made.
$ sudo service apache2 restartDefine Apache Load-balancer
This server will handle all HTTP requests from site visitors. As you might see, this means even though you run a load balanced system, using only a single load balancer means you still have a SPOF (single point of failure). It is also possible to configure an environment where yet another server will act as the fail-over load-balancer if the first one fails, but this is outside the scope of this guide.
To set up our load-balancer, we use the Apache web-server and its modules mod_proxy and mod_proxy_ajp. These are part of most of the Apache web-server distributions.
First, create a virtual host handling the requests for your domain: www.yourcompany.com
<VirtualHost *:80>
        ServerName www.yourcompany.com
        ServerAlias yourcompany.com

        DocumentRoot /var/www/html

        ProxyRequests Off

        Header add Set-Cookie "ROUTEID=.%{BALANCER_WORKER_ROUTE}e; path=/" env=BALANCER_ROUTE_CHANGED

        <Proxy balancer://mycluster>
          BalancerMember ajp://public1.yourcompany.com:8009 route=public1
          BalancerMember ajp://public2.yourcompany.com:8009 route=public2
          ProxySet lbmethod=byrequests
          ProxySet stickysession=ROUTEID
        </Proxy>

        ProxyPass / balancer://mycluster/

</VirtualHost>
Configure Tomcat Public1 / Public2
Let's look at the relevant configuration here to set up the load-balancer. Most likely you will also have an Apache web-server installed on this machines, as for accessing the author instance if located on one of this servers with a nice URL. Here we suggest to use a single Tomcat application server for hosting one public instance. Make sure the AJP Port is set correctly to what you have defined in the virtual host configuration of the load-balancer (8009 as the default value used here).
If you want to change the AJP Port of your application server, this can be done here.
Tomcat config: LOGICALDOC_HOME/tomcat/conf/server.xml
<Connector port="8009" protocol="AJP/1.3" redirectPort="8443" URIEncoding="UTF-8" />Now in the same file as we configure the AJP Port server.xml we need to configure the jvmRoute for sticky sessions working correctly. Use the name defined in the virtual host configuration on load-balancer, the route value here separately for the two servers.
<Engine name="Catalina" defaultHost="localhost" jvmRoute="publicXY">Note: on the LogicalDOC node Tomcat's config you should change publicXY with public1 or public2 depending on the node
Done
That's basically it. Now you can set your DNS entry of www.yourcompany.com to your Load-Balancer's IP address and enjoy the comfort and security of a redundant LogicalDOC installation. If one of the public LogicalDOC servers is failing, mod_proxy on your load-balancer will automatically detect this and stop serving requests to that server.
You can test this by stopping Tomcat on one of the machines. Your load-balancer Apache webserver error_log will show something like
[Tue Jul 28 18:17:35 2009] [error] proxy: AJP: failed to make connection to backend: public1.yourcompany.com
[Tue Jul 28 18:17:36 2009] [error] ap_proxy_connect_backend disabling worker for (public1.yourcompany.com)
Enable Balancer Manager
This example requires mod_proxy_balancer and mod_status. The mod_proxy_balancer module provides you with a graphic web interface to dynamically manage the various members of the set. You can some screenshots of the interface from Apache documentation Reverse Proxy Guide
<VirtualHost *:80>
        ServerName www.yourcompany.com
        ServerAlias yourcompany.com

        DocumentRoot /var/www/html

        ProxyRequests Off
        ProxyPass /balancer-manager !

        Header add Set-Cookie "ROUTEID=.%{BALANCER_WORKER_ROUTE}e; path=/" env=BALANCER_ROUTE_CHANGED

        <Proxy balancer://mycluster>
          BalancerMember ajp://public1.yourcompany.com:8009 route=public1
          BalancerMember ajp://public2.yourcompany.com:8009 route=public2
          ProxySet lbmethod=byrequests
          ProxySet stickysession=ROUTEID
        </Proxy>

        <Location /balancer-manager>
          SetHandler balancer-manager
        </Location>

</VirtualHost>
We excluded the path balancer-manager from the proxy, since we can manage our balanced members with the balancer-manager tool. The balancer-manager is part of the mod_proxy_balancer module.
You could access the balancer-manager with http://www.yourcompany.com/balancer-manager to manually disable a worker. The balancer-manager also offers you an easy way to set different load factors for your servers.
| Do not enable the balancer-manager until you have secured your server. In particular, ensure that access to the URL is tightly restricted. |
