Configure Apache load balancer with mod proxy: Difference between revisions
| Line 30: | Line 30: | ||
First, create a virtual host handling the requests for your domain: ldproxy.org | First, create a virtual host handling the requests for your domain: ldproxy.org | ||
<source lang=" | <source lang="bash"> | ||
<VirtualHost *:80> | <VirtualHost *:80> | ||
Revision as of 09:42, 27 April 2020
Server setup
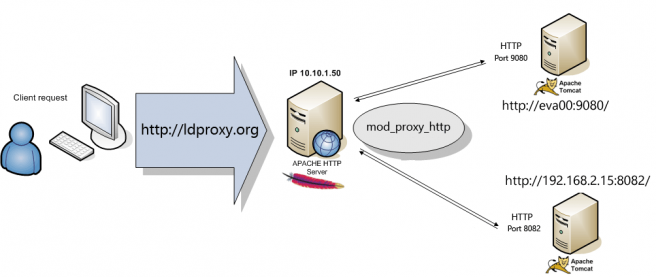
The layout may look something like this (we will refer to these names through the rest of the guide).

Enable Apache modules in Ubuntu
Use the following commands:
$ sudo a2enmod proxy
$ sudo a2enmod proxy_http
$ sudo a2enmod proxy_balancer
$ sudo a2enmod lbmethod_byrequests
$ sudo a2enmod headers
Run all the above commands then restart Apache to obtain the effect of changes we have made.
$ sudo service apache2 restart
Define Apache Load-balancer
This server will handle all HTTP requests from site visitors. As you might see, this means even though you run a load balanced system, using only a single load balancer means you still have a SPOF (single point of failure). It is also possible to configure an environment where yet another server will act as the fail-over load-balancer if the first one fails, but this is outside the scope of this guide.
To set up our load-balancer, we use the Apache web-server and its modules mod_proxy, mod_proxy_http and mod_proxy_balancer. These are part of most of the Apache web-server distributions.
First, create a virtual host handling the requests for your domain: ldproxy.org
<VirtualHost *:80>

  ServerName ldproxy.org

  ServerAdmin webmaster@localhost
  DocumentRoot /var/www/html

  ProxyRequests Off
  ProxyPreserveHost On

  Header add Set-Cookie "ROUTEID=.%{BALANCER_WORKER_ROUTE}e; path=/" env=BALANCER_ROUTE_CHANGED
  <Proxy balancer://mycluster>
        BalancerMember "http://eva00:9080" route=1
        BalancerMember "http://192.168.2.15:8082" route=2

        ProxySet lbmethod=byrequests
        ProxySet stickysession=ROUTEID
    </Proxy>

  ProxyPass / balancer://mycluster/
  ProxyPassReverse / balancer://mycluster/

  ErrorLog ${APACHE_LOG_DIR}/proxy-error.log
  CustomLog ${APACHE_LOG_DIR}/proxy-access.log combined

</VirtualHost>
The load balancer nodes are two LogicalDOC servers that are accessed by IP and by hostname (eva00), of course the Apache server must be able to resolve the hostname.
Furthermore we can note that the Apache server adds a Cookie ROUTEID to make sessions sticky and redirect all subsequent requests to the same LogicalDOC node of the cluster
The setting ProxySet lbmethod=byrequests distribute the requests among the various workers to ensure that each gets their configured share of the number of requests.
Load balancer scheduler algorithm
At present, there are 4 load balancer scheduler algorithms available for use: Request Counting (mod_lbmethod_byrequests), Weighted Traffic Counting (mod_lbmethod_bytraffic), Pending Request Counting (mod_lbmethod_bybusyness) and Heartbeat Traffic Counting (mod_lbmethod_heartbeat). These are controlled via the lbmethod value of the Balancer definition. See the ProxyPass directive for more information, especially regarding how to configure the Balancer and BalancerMembers.
Configure Tomcat
You need to change the configuration of the Tomcat in LogicalDOC. Generally it is a matter of modifying the file server.xml located in the /tomcat/conf folder
Tomcat config: LOGICALDOC_HOME/tomcat/conf/server.xml
In this file we are going to add the proxyName and proxyPort attributes to the Connector element
    <Connector port="8082" protocol="HTTP/1.1"
               connectionTimeout="20000"
               redirectPort="8445"
               URIEncoding="UTF-8" server="Undisclosed/8.41" proxyName="ldproxy.org" proxyPort="80" />
The proxyName will cause servlets inside this web application to think that all proxied requests were directed to ldproxy.org on port 80
Done
That's basically it. Now you can set your DNS entry of ldproxy.org to your Load-Balancer's IP address and enjoy the comfort and security of a redundant LogicalDOC installation. If one of the public LogicalDOC servers is failing, mod_proxy on your load-balancer will automatically detect this and stop serving requests to that server.
You can test this by stopping Tomcat on one of the machines. The configured ErrorLog file proxy-error.log will show something like
[Tue Jun 25 09:55:34.431671 2019] [proxy:error] [pid 12308] (113)No route to host: AH00957: HTTP: attempt to connect to 192.168.2.15:8082 (192.168.2.15) failed
[Tue Jun 25 09:55:34.431768 2019] [proxy:error] [pid 12308] AH00959: ap_proxy_connect_backend disabling worker for (192.168.2.15) for 60s
Advanced Configuration
This below is a more advanced example. It requires a specific Apache module: mod_proxy_balancer which allows you to modify some parameters of the nodes that make up the cluster in real time. For more information Balancer Manager
Also in this example the status directive was applied to the second node of the cluster. This causes all requests to be sent to the first server and keeps the second LogicalDOC server in hot-standby mode (it will only be used if no other viable workers or spares are available in the balancer set).
<VirtualHost *:80>

    ServerName ldproxy.org

    ServerAdmin webmaster@localhost
    DocumentRoot /var/www/html

    ProxyRequests Off
    ProxyPreserveHost On

    <Location /balancer-manager>
      SetHandler balancer-manager
      #Require ip 10.0.0.1 10.0.0.2
    </Location>

    ProxyPass /balancer-manager !

    Header add Set-Cookie "ROUTEID=.%{BALANCER_WORKER_ROUTE}e; path=/" env=BALANCER_ROUTE_CHANGED
    <Proxy balancer://mycluster>
        BalancerMember "http://192.168.2.15:8082" route=1
        BalancerMember "http://192.168.2.5:8080" route=2
        # The server below is on hot standby. It will be used only if no other members (or spares) are available in the load balancer set
        BalancerMember "http://192.168.2.11:8080" route=3 status=+H

        ProxySet lbmethod=byrequests
        ProxySet stickysession=ROUTEID
    </Proxy>

    ProxyPass / balancer://mycluster/
    ProxyPassReverse / balancer://mycluster/

    ErrorLog ${APACHE_LOG_DIR}/proxy-error.log
    CustomLog ${APACHE_LOG_DIR}/proxy-access.log combined

</VirtualHost>
| Do not enable the balancer-manager until you have secured your server. In particular, ensure that access to the URL is tightly restricted. |