Installation using PostgreSQL
From LogicalDOC Community Wiki
Revision as of 21:28, 23 June 2009 by Svenarajala (talk | contribs) (→Configure PostgreSQL (Linux Ubuntu 8.10))
Contents
Configure PostgreSQL 8.3 (Linux Ubuntu 8.10)
Download PostgreSQL
- If you do not have PostgreSQL installed yet, open a terminal in Ubuntu and type sudo apt-get install postgresql-8.3 postgresql-client-8.3 postgresql-contrib-8.3
- Press Enter
Configure Access
Change postgres User Password
- Access the PostgreSQL interactive terminal by typing sudo -u postgres psql template1 in an Ubuntu terminal
- Press Enter
- At the template1=# prompt, type ALTER USER postgres with encrypted password 'N3wP@ssw0rd!';
- Press Enter .
- At the template1=# prompt type \q and press Enter to quit the PostgreSQL interactive terminal
Import Additional Schema
- In an Ubuntu terminal, type sudo -u postgres psql < /usr/share/postgresql/8.3/contrib/adminpack.sql
- Press Enter
- Type sudo -u postgres psql < /usr/share/postgresql/8.3/contrib/pgcrypto.sql
- Press Enter
Edit the postgresql.conf file
- In an Ubuntu terminal type sudo vim /etc/postgresql/8.3/main/postgresql.conf, press Enter
- Scroll down to #listen_addresses = 'localhost' located in the CONNECTIONS AND AUTHENTICATION section, under the Connection Settings subsection.
- Press I to edit the file
- Remove the # to uncomment listen_addresses = 'localhost'
- Change listen_addresses = 'localhost' to listen_addresses = '*'
- Scroll down to #password_encryption = on in the Security and Authentication subsection
- Remove the # to uncomment password_encryption = on
- Press Esc, then type :wq to write your changes to disk and quit the editor
- Press Enter
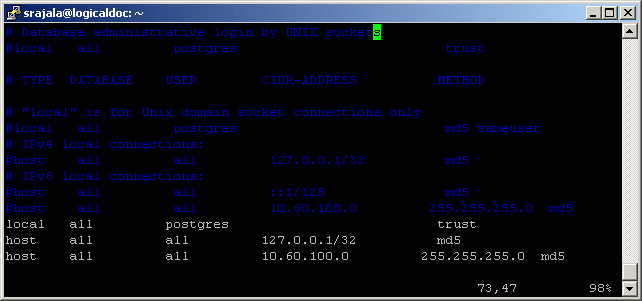
Edit the pg_hba.conf file
- In an Ubuntu terminal, type sudo vim /etc/postgresql/8.3/main/pg_hba.conf
- Scroll down toward the bottom
- Press I to edit
- Use the # to comment out all the lines:
# host all all ::1/128 md5
# local all all ident sameuser
# local all postgres ident sameuser - Type the following lines at the end of the file:
local all postgres trust
local all postgres 127.0.0.1/32 md5
host all all 10.60.100.0 255.255.255.0 md5Note: This will be the local network IP range that the server is on.

- Press Esc, then type :wq and press Enter to write your changes to disk and quit
Restart PostgreSQL
- In an Ubuntu terminal, type sudo /etc/init.d/postgresql-8.3 restart
- Press Enter
Configure Database for Logicaldoc
- In an Ubuntu terminal, type sudo –u postgres createdb logicaldocdb and press Enter
- Type sudo –u postgres psql logicaldocdb and press Enter
Note: If prompted for a password, use the postgres password
- At the PostgreSQL interactive terminal prompt, type CREATE ROLE logicaldocgroup INHERIT;
- Press Enter
- Type CREATE ROLE logicaldocservice LOGIN NOINHERIT;
- Press Enter
- Type GRANT logicaldocgroup TO logicaldocservice;
- Press Enter
- Type ALTER USER logicaldocservice with encrypted password 'LogicaldocPassword';
- Press Enter
- Type ALTER DATABASE logicaldocdb OWNER TO logicaldocgroup;
- Press Enter
- Type \q and press Enter to return to the Ubuntu terminal prompt