Fast and Furious
Introduction
The developer environment can be set in any Operating System (Windows, Linux, etc..) since LogicalDOC is a multi-platform system, but we recommend Windows, since it is the development environment of reference.
As a result, most of the examples will show paths and screenshots of Windows.
Requirements
You need Tortoise SVN client (TortoiseSVN 1.8.10), Java JDK 1.7, Maven 3.2.5, Maven Ant Tasks 2.1.3, Ant 1.7.1, Eclipse Luna 4.4.1, Tomcat 7.0.57
Prepare the Workspace
Create the folder workspace71 as sub folder of your Home Directory.
In my case, since the home directory of my user is: C:\Users\george ,I have to create the folder path C:\Users\george\workspace71

Checkout a working copy of LogicalDOC CE
Checkout the following packages from the SVN repository of LogicalDOC CE on SourceForge:
ant, poms, logicaldoc
Checkout the LD's ant package using TortoiseSVN
Note: when you install TortoiseSVN on your Windows system it will add two new items to the contextual menu: SVN Checkout... and TortoiseSVN; you can activate the contextual menu simply using the right mouse click on a folder.
This are the SVN paths for source and target
svn://svn.code.sf.net/p/logicaldoc/code/build/ant/trunk
C:\Users\george\workspace71\ant
-
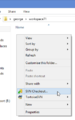 SVN Checkout contextual menu (mouse right click)
 -
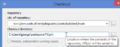 Checkout the LD's ant package

Repeat the steps above for the other two packages below
svn://svn.code.sf.net/p/logicaldoc/code/build/poms/trunk
C:\Users\george\workspace71\poms
svn://svn.code.sf.net/p/logicaldoc/code/community/logicaldoc/trunk
C:\Users\george\workspace71\logicaldoc
Install the parent dependencies
At this point you need to install the dependencies shared by the various LogicalDOC's modules.
To do this, open a command shell, move to the folder poms and run the command:
mvn clean install

Note: this process involves downloading several libraries from the Internet and may take a few tens of minutes to complete (depending on the speed of your internet connection).
Prepare the project for Eclipse
We're going to generate a project for Eclipse using the Maven's plugin with the same name.
By launching this command Maven will download all the dependencies (jar libraries) of the project and will produce a project file for Eclipse with all the libraries already linked (ready for compilation).
 cd ..\logicaldoc
 mvn eclipse:eclipse
Note: even this command launches the download of several libraries from the internet
Load the project in Eclipse
This step assumes that the Google plugins have already been properly installed in your Eclipse IDE, but if it does not refer to the guide: Configure Eclipse.
Start Eclipse by specifying the workspace path C:\Users\george\workspace71

Import the project logicaldoc
Import the project logicaldoc and all its children projects.
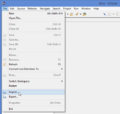
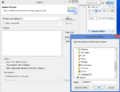
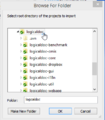
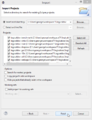
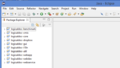
The images below describe in sequence the steps required to import the project logicaldoc and all its sub-projects that make it up.
-
 1
1 -
 2
2 -
 3
3 -
 4
4 -
 5
5 -
 6
6


- Starting the import procedure
- Selecting the type of project
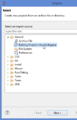
- Selecting the project root directory
- Selecting the project root directory 02
- Projects children of the root folder are marked to be imported
- The projects have been imported into the workspace
Building the sources
After importing the projects, you can launch the build of sources from Eclipse.
All this is already ready to use, there is nothing to do, the libraries needed for compilation have already been downloaded previously from Maven and linked to the Eclipse project from the command mvn that we previously launched in step Prepare the project for Eclipse