|
|
| (One intermediate revision by the same user not shown) |
| Line 13: |
Line 13: |
| | [[Image:Wget_qnap.png]] | | [[Image:Wget_qnap.png]] |
| | | | |
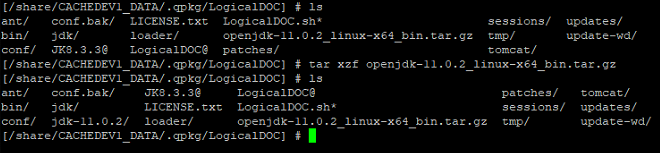
| − | 3. Execute the command '''tomcat8w.exe //MS/LogicalDOC''' (if you do not have tomcat8w.exe use LogicalDOCw.exe instead) | + | 3. When the download completes, unpack the archive with the command '''tar xzf openjdk-11.0.2_linux-x64_bin.tar.gz'''<br/> |
| | + | [[Image:Tar_qnap.png]] |
| | | | |
| − | 4. This creates a tray icon with the LogicalDOC’s logo | + | 4. After unpacking the archive, execute the two commands '''mv jdk jdk.old''' and '''mv jdk-11.0.2 jdk''' |
| | | | |
| − | 5. Right click on it and choose '''Configure...'''<br/> | + | 5. Restart the LogicalDOC application |
| − | [[Image:Ldoc_tray.png]]
| |
| − | | |
| − | 6. Now open the <b>Java</b> tab<br/>
| |
| − | [[Image:ldoc_config.png]]
| |
| − | | |
| − | 7. In the '''Java Virtual Machine''' put the full path of your jvm.dll (something like C:\Program Files\Java\jdk-11.0.4\bin\server)
| |
| − | | |
| − | 8. In the '''Java Options''' text area, delete what you have and put this new text (remember to replace ''<LDOC_HOME> with your LogicalDOC’s installation folder)'':
| |
| − | | |
| − | <div style="margin-left:1.7cm;margin-right:0cm;">''-Dcatalina.home='''<LDOC_HOME>'''\tomcat''</div>
| |
| − | | |
| − | <div style="margin-left:1.7cm;margin-right:0cm;">''-Dcatalina.base='''<LDOC_HOME>'''\tomcat''</div>
| |
| − | | |
| − | <div style="margin-left:1.7cm;margin-right:0cm;">''-Dignore.endorsed.dirs='''<LDOC_HOME>'''\tomcat\endorsed''</div>
| |
| − | | |
| − | <div style="margin-left:1.7cm;margin-right:0cm;">''-Djava.io.tmpdir='''<LDOC_HOME>'''\tomcat\temp''</div>
| |
| − | | |
| − | <div style="margin-left:1.7cm;margin-right:0cm;">''-Djava.util.logging.manager=org.apache.juli.ClassLoaderLogManager''</div>
| |
| − | | |
| − | <div style="margin-left:1.7cm;margin-right:0cm;">''-Djava.util.logging.config.file='''<LDOC_HOME>'''\tomcat\conf\logging.properties''</div>
| |
| − | | |
| − | <div style="margin-left:1.7cm;margin-right:0cm;">''-Dsolr.disable.shardsWhitelist=true''</div>
| |
| − | | |
| − | 9. Clear the Java 9 Options
| |
| − | | |
| − | 10. Click on '''Apply''' and then '''Ok'''
| |
| − | | |
| − | 11. Restart the '''LogicalDOC''' service
| |
| − | | |
| − | 12. Open a shell as Administator and go to '''<LDOC_HOME>'''\update-wd
| |
| − | | |
| − | 13. Execute the command '''update-wdw.exe //MS/LogicalDOC-Update'''
| |
| − | | |
| − | 14. This creates another tray icon with the LogicalDOC’s logo
| |
| − | | |
| − | 15. Right click on it and choose <b>Configure...</b><br/>
| |
| − | [[Image:update_tray.png]]
| |
| − | | |
| − | 16. Now open the <b>Java</b> tab<br/>
| |
| − | [[Image:update_config.png]]
| |
| − | | |
| − | 17. In the '''Java Virtual Machine''' put the full path of your jvm.dll (something like C:\Program Files\Java\jdk-11.0.4\bin\server)
| |
| − | | |
| − | 18. Click on '''Apply''' and then '''Ok'''
| |
| − | | |
| − | 19. Restart the '''LogicalDOC Update''' service
| |
Reconfigure LogicalDOC to use Java 11 on Synology and QNAP
Starting from version 8.3.4 LogicalDOC does not work with Java8 anymore so you have to install Java11.
It is important to install Java11 and not Java12 nor Java13, because Java11 is the latest LTS(Long Term Support) release available at the moment.
Given <LDOC_HOME> the installation path of LogicalDOC(by default it is /share/CACHEDEV1_DATA/.qpkg/LogicalDOC/ in QNAP and /var/packages/LogicalDOC/target/ in Synology), please proceed as follows:
1. Open a shell into your NAS as admin the cd to <LDOC_HOME>

2. Here execute the command wget https://service.logicaldoc.com/jdk/openjdk-11.0.2_linux-x64_bin.tar.gz

3. When the download completes, unpack the archive with the command tar xzf openjdk-11.0.2_linux-x64_bin.tar.gz
4. After unpacking the archive, execute the two commands mv jdk jdk.old and mv jdk-11.0.2 jdk
5. Restart the LogicalDOC application


